I think it might be time to put down the crochet hook and dust off the sewing machine... My little sister is a tattoo artist and in looking for images of birds and blossom for a new tattoo (type in birds and blossom to google images, apart from the 80's tv character there's so much pretty I could just browse it all day) when I found this lovely thing. The website is called 'Spool' and has some really lovely, simple free patterns.
Very much loving the cute critters and lovely fabrics used in the creations of Singapore based littleoddforest, I need to go there! http://forestprints.com/...
This pattern does assume a basic understanding of how to crochet and does use a few different stitches.
Orange wool
Dark blue wool
Med. Blue wool
Beige wool
Black wool
Pink wool
Crochet needle (suitable for your wool thickness)
Wool needle
Black felt
White embroidery thread
Embroidery needle
Stuffing
Abbreviations:
sc - single crochet
dec – decrease
sl st – slip stitch
hdc – half double crochet
tc – triple crochet
Head – orange yarn
1. Magic Ring 6 – sc (6)
2. 2 sc in each stitch (12)
3. *2 sc then sc in next stitch* (18)
4. *2 sc then sc in next 2 stitches* (24)
5. *2sc then sc in next 3 stitches* (30)
6. *2sc then sc in next 4 stitches* (36)
7-12. sc in every stitch (36)
13. *dec 2 then sc in next 4 stitches* (30)
14. *dec 2 then sc in next 3 stitches* (24)
15. *dec 2 then sc in next 2 stitches* (18)
16. *dec 2 then sc in next stitch* (12)
17. Stuff head quite firmly
18. *dec 2 * sl st (6)
19. close
Ears - orange yarn
1. Chain 4
2. sc in 2nd chain from end
3. dc
4. tc – sl st to finish, leave a nice long tail to attach it to the head
Hat – med.blue yarn
1. Magic Ring 5 (5)
2. 2sc, sc, 2sc, sc, 2sc (8)
3. *sc* (8)
4. *2sc* (16)
5. *sc* (16)
TURN
6. In outer loop only *2sc, sc in the next 3 stitches* (20)
7. *sc* - sl st to finish
6. Using dark blue yarn embroider stripe around the bottom
8. Stuff lightly, shape and attach to head
Body – orange and med. blue yarn
1. Using blue magic ring 6 (6)
2. sc in each stitch (12)
4. *sc* (18)
5-13. switch to orange *sc* (18)
14. *dec 2 then sc in next stitch* (12)
15. Stuff body quite firmly
16. *dec 2 * sl st to finish (6)
17. Attach to head with blue at the top (this is his collar)
Tummy – beige
1. ch 6 – turn sc
2. ch 1 – sc along other edge
3-8. repeat steps 1-2, sl st
9. sew on to front of body
Arms – orange
1. Magic ring 4 (4)
2. *2 sc then sc in next stitch* (6)
3-6. *sc* (6)
7. *2 sc then sc in next stitch* (9)
8. Stuff very lightly, I found using the tails of yarn was enough
9. *sc* (9)
10. *dec 2* sl st to finish
11. Attach to body where the ‘collar’ ends
Legs – 0range
1. Magic ring 4 (4)
2. *2 sc then sc in next stitch* (6)
3-6. *sc* (6)
7. Change to med blue for the boots, sc (6)
8. sc, sc, 2sc, 2sc, sc, sc (8)
9-10. sc (8)
11. Stuff very lightly
12. dec, sc, dec, sc, dec – sl st close(6)
13. attach to body with ‘toes’ pointing forwards
Nose – beige
1. chain 6
2. sc in 2nd chain from end
3. dc, sc, dc, sc – sl st
4. Sew on to face with the flat edge as the top of the ‘nose’
5. Using pink wool embroider a little nose in the middle at the top
Eyes
Cut 1 circle out of black felt, embroider white pupil with embroidery thread in the right corner, sew on to right side of head
Tail – orange
1. Chain 16 - turn
2. sc, slst and attach to the body
Eye patch - black
1. chain 35 (although wrap it around the head to check)
2. In second loop from end sc
3. dc
4. sc
5. sl st and sew all in place
You can now get my new book (hooray!) called "Crochet-Dress Up" by CICO publishers, full of cool, easy dress up patterns for kids.
You can now get my new book (hooray!) called "Crochet-Dress Up" by CICO publishers, full of cool, easy dress up patterns for kids.
Having not introduced myself I thought I would show you a few of the critters that I've made using other peoples patterns (that I will post links to) and then ones I've made myself (withhout written patterns as yet), all in the name of spreading the amigurumi love. I also intend to show you other awesome things in the world of craft but that's for another day.
Hi there, I haven’t ever written any of my patterns out before and I don’t know things like wool gauges or anything, I just like making things, so please forgive me if anything is confusing, and please feel free to ask any questions that you like. I made this for my little boy, I hope that Meomi don't mind me sharing it with everyone.
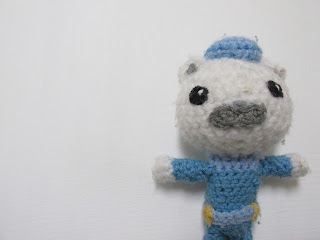
Octonauts - Crochet Captain Barnacles
This pattern does assume a basic understanding of how to crochet and does use a few different stitches.
You will need:
Thick white wool
Dark blue wool
Med. Blue wool
Grey wool
Dark grey wool
Yellow wool
Yellow wool
Crochet needle (suitable for your wool thickness)
Wool needle
Black felt
White embroidery thread
Embroidery needle
Stuffing
Abbreviations:
sc - single crochet
* * - repeat steps to the end of the row
dec – decrease
sl st – slip stitch
hdc – half double crochet
dc - double crochet
dc - double crochet
Head – thick white yarn
1. Magic Ring 6 – sc (6)
2. 2 sc in each stitch (12)
3. *2 sc then sc in next stitch* (18)
4. *2 sc then sc in next 2 stitches* (24)
5. *2sc then sc in next 3 stitches* (30)
6-10. sc in every stitch (30)
11. *dec 2 then sc in next 3 stitches* (24)
12. *dec 2 then sc in next 2 stitches* (18)
13. *dec 2 then sc in next stitch* (12)
14. Stuff head quite firmly
15. *dec 2 * sl st (6)
16. close
Ears – thick white yarn
1. Chain 4
2. sc in 2nd chain from end
3. hdc
4. sc – sl st to finish, leave a nice long tail to attach it to the head
5. Using light grey wool embroider a few stitches on the front, inside of the ear
Hat – light blue yarn
1. Magic Ring 6 – sc (6)
2. sc in each stitch (12)
3. *2 sc then sc in next stitch* (18)
4-6. *sc* - sl st to finish (18)
7. Using dark blue yarn embroider two stripes around the bottom
8. Shape and attach to head
Body – light and dark blue yarn
1. Using light blue magic ring 6 – sc (6)
2. sc in each stitch (12)
3. *2 sc then sc in next stitch* (18)
4. *sc* (18)
5-13. switch to dark blue *sc* (18)
14. *dec 2 then sc in next stitch* (12)
15. Stuff body quite firmly
16. *dec 2 * sl st to finish (6)
17. Attach to head with light blue at the top (this is his collar)
Arms – dark blue
1. Magic ring 4 (4)
2. *2 sc then sc in next stitch* (6)
3-6. *sc* (6)
7. Change to thick white, sc (6)
8. Stuff very lightly, I found using the tails of yarn was enough
9. *dec 2* sl st to finish
10. Attach to body where the ‘collar’ ends
Legs – Dark blue
1. Magic ring 4 (4)
2. *2 sc then sc in next stitch* (6)
3-6. *sc* (6)
7. Change to light blue for the boots, sc (6)
8. sc, sc, 2sc, 2sc, sc, sc (8)
9-10. sc (8)
11. Stuff very lightly
12. dec, sc, dec, sc, dec – sl st close(6)
13. attach to body with ‘toes’ pointing forwards
Nose – light grey
1. chain 6
2. sc in 2nd chain from end
3. dc, sc, dc, sc – sl st
4. Sew on to face with the flat edge as the top of the ‘nose’
5. Using dark grey wool embroider a little nose in the middle at the top
Eyes
Cut 2 circles out of black felt, embroider white pupils with embroidery thread in the right corner, sew on to head
Belt- dark blue
1. Chain 18 - turn
2. sc in each stitch, sew ends together
3. Using yellow yarn loop a few stitches around the belt
You can also get a collection of cool patterns for kids in my new book "Crochet Dress-Up" by CICO publishers :)
Belt- dark blue
1. Chain 18 - turn
2. sc in each stitch, sew ends together
3. Using yellow yarn loop a few stitches around the belt
You can also get a collection of cool patterns for kids in my new book "Crochet Dress-Up" by CICO publishers :)


